The latest update to Windows 11 became available in late September 2023. Windows 11 23H2 includes security protocol updates, bug fixes and feature improvements, and it adds Windows Copilot to the operating system.
The rollout of the Windows 11 23H2 update to all eligible computers, particularly your computer, could take time if you leave it up to Microsoft and its standard protocols; however, you can accelerate the rollout process by taking a few simple steps to request installation now and on your schedule. Here are three ways you can install Windows 11 23H2.
How to install Windows 11 23H2 from settings
The rollout protocols Microsoft uses after major update releases is a bit of a mystery, but there is one setting that can trigger the installation of Windows 11 23H2.
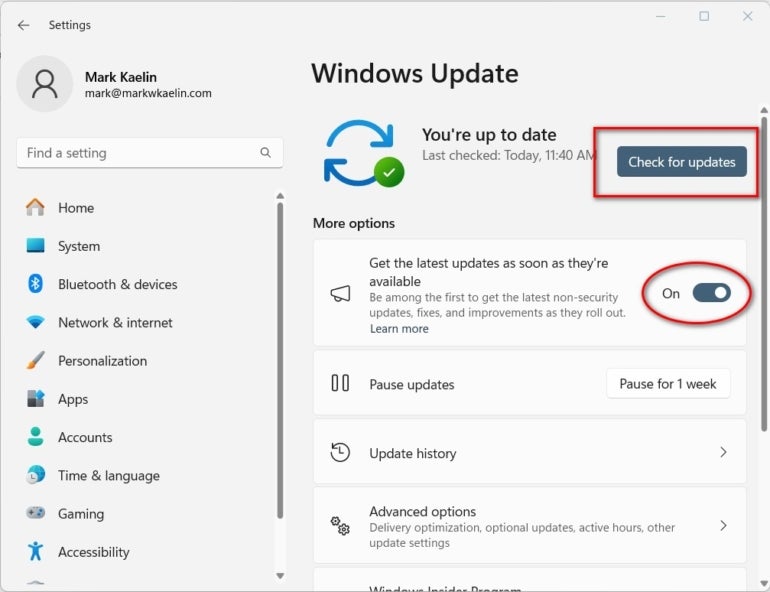
Open the Windows 11 Settings screen and navigate to the Windows Update section (Figure A).
Figure A

Toggle on the setting Get The Latest Updates As Soon As They’re Available and click the Check For Updates button.
For many PCs, this simple step will be enough to trigger the installation of Windows 11 update 23H2. After a few moments, a new entry for 23H2 should appear, and you will just click the Download And Install button to begin.
However, the effectiveness of this method is not guaranteed because Microsoft’s protocols may still require the PC to wait for the update. Microsoft’s protocols in this matter are a mystery.
How to install Windows 11 23H2 with the Installation Assistant
The most effective way to trigger the installation of 23H2 on a single Windows 11 PC is to use Microsoft’s Installation Assistant.
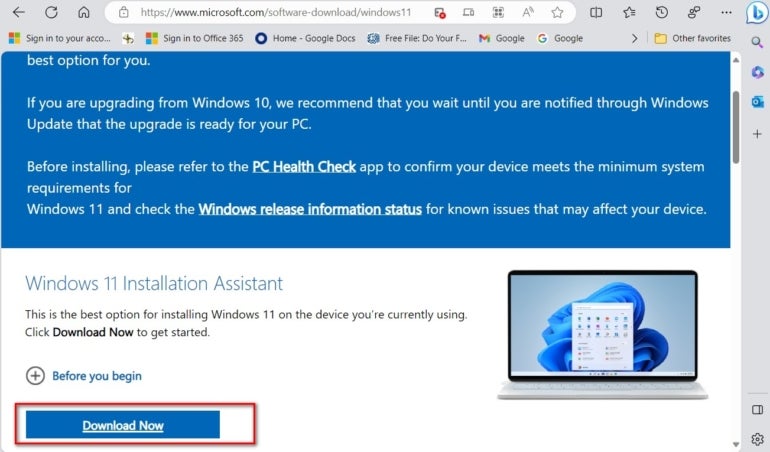
Open your favorite web browser and navigate to the Windows 11 download support website. Under the Windows 11 Installation Assistant, click the Download Now button (Figure B).
Figure B

After the tool is finished downloading, double-click the executable file Windows11InstallationAssistant.exe and follow the instructions.
Microsoft Installation Assistant will install the new 23H2 version of Windows 11 and preserve your files, settings and apps.
How to install Windows 11 23H2 with the Media Creation Tool
The previous two methods work well for individual computers, but if you manage IT for a small or medium-sized business, you may need to install Windows 11 23H2 on several PCs. The Media Creation Tool is the best solution for such situations because, with it, you will create a USB drive that can be used over and over to update each PC.
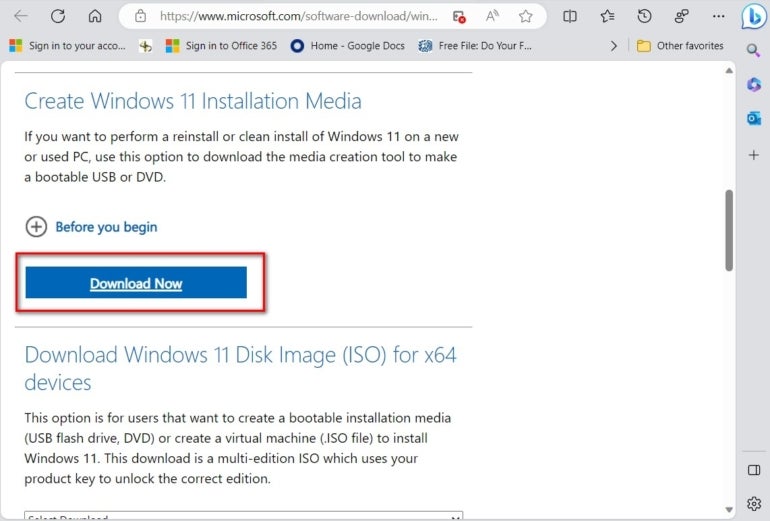
Open your favorite web browser and navigate to the Windows 11 download support website. This time, scroll further down the page until you find the Download Now button under the Create Windows 11 Installation Media heading (Figure C).
Figure C

After the download is complete, double-click the MediaCreationToolW11.exe file and follow the instructions. Note: You will need a USB drive with at least 8 GB of free memory to complete the process; optionally, you could create a DVD compact disk instead of using a USB drive.
After the process of creating the installation USB drive is complete, insert the USB drive into a PC and double-click the setup.exe file located on the drive and follow the screen prompts. The process of updating to Windows 11 23H2 will begin.
